Does it look intimidating to design and install full wall wainscoting? I’m sure many think so! But if you know these 10 essential wainscoting tips and tricks, it’ll make the process and results a lot more pleasant. With its ability to add character, elegance and charm to any space, overlay wainscoting or panel molding has become my favorite way to quickly elevate a room without undergoing a major remodel. But only when done right! I’ve taken down wainscoting in previously purchased homes, and reinstalled it, because it did not look good.
Take a look at these two images to see how properly installing full wall wainscoting can make such a big difference
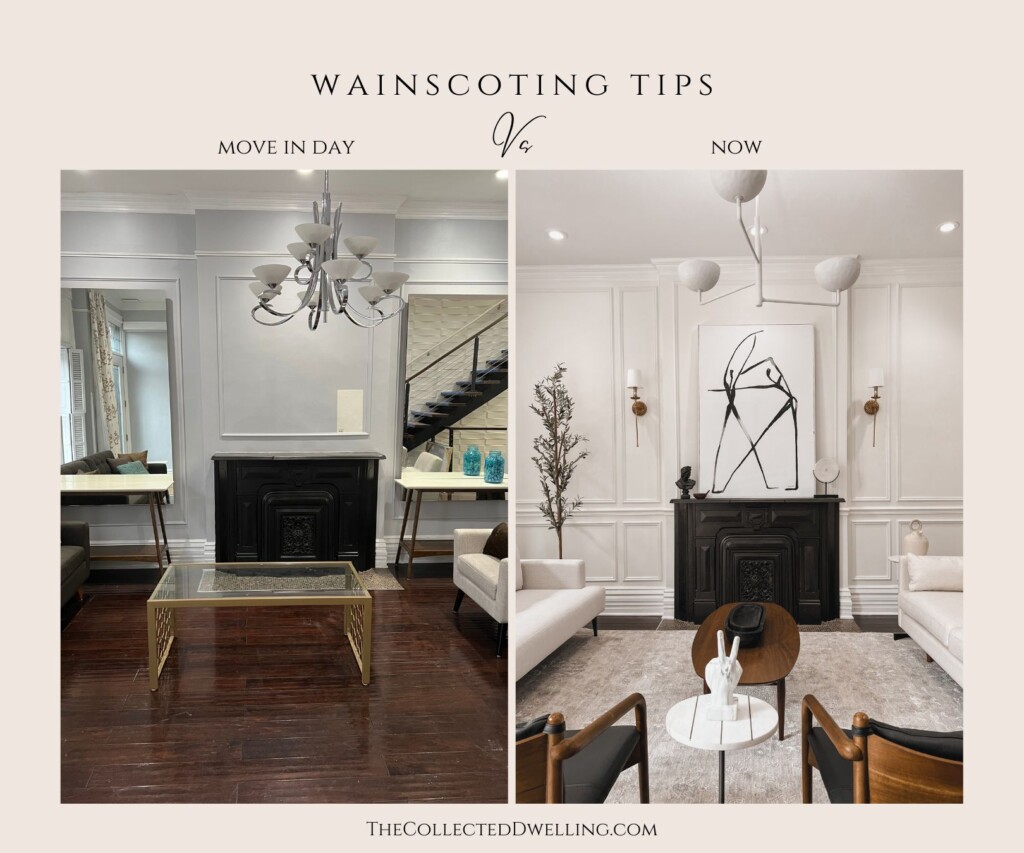
The wainscoting just looks very underwhelming in the before image. So to avoid such results, I’m sharing my 10 tips to help you get it right before you waste your time and money.
10 Wainscoting Tips and Tricks
Please note that these tips apply to ‘overlay wainscoting’, which involves applying a layer of decorative molding directly onto a flat wall surface. There are many other forms of wainscoting such as shiplap, flat panel, raised panel, etc. While some of these tips may apply to them as well, some won’t. So make sure to do your own research if you’re installing something other than overlay wainscoting.
1. Develop a clear vision of your wainscoting design
Define your room’s style
- Start by defining the style of the room: will it be modern, vintage modern, transitional, traditional, etc. It’s so important to have a clear vision of your end results (style and functionality of the room) before you start the process of designing and installing wainscoting.
- Create a Pinterest board and start saving images that inspire you. Check out my Pinterest board where I saved a ton of gorgeous wainscoting inspiration
Draw it out
- Measure the room and note any architectural features such as fireplace, windows, door, etc.
- Draw out each wall on a separate piece of graph paper (unless you know how to use a design / sketching software). You want to make sure you are drawing the wall to scale. Using graph paper allows you to do that by defining how many boxes represent a foot. For example, you can set your scale where 2 boxes = 1 foot. A 16′ wide wall = 32 boxes. Now measure and sketch all your architectural features (you don’t need to be an artist, just use basic shapes like squares and rectangles) and make sure they are also to scale!
- Once your room is drawn out on graph paper, make many photocopies. Then start drawing out different wainscoting ideas.
Here’s my drawing for our living room’s ‘fireplace wall’ as an example

2. Thickness of wainscoting/molding panels
This is one of the main reasons I choose to replace previously installed panel molding. If the panel is too thin, it just doesn’t make as much of an impact as it should. It looks pretty underwhelming. I would never purchase panel molding under 1.5” wide unless you have a very specific vision you are trying to achieve. I prefer to go with 2″ wide panels if the room is spacious enough.
3. Shape of wainscoting/molding panels
There are many panel molding variations you can choose from. And they all contribute to differently to design styles once installed. Make sure to keep in mind the final style of the room before you pick your panel mold shape. Below are examples of:
1. classic panel mold: which you can use if your design direction is transitional, traditional, or vintage modern

2. modern panel mold: which you can use if you want to go the modern, minimalist, vintage modern route. Notice I included ‘vintage modern’ under both panel options, because when considering other elements in the room, you can go with either one to achieve your vision.

This article has a good list of all the types of panel moldings you should considering when designing the room.
4. Height of Panel Molding
Now this one may be a personal preference, but I always go as high as a couple inches below crown and above baseboards when covering a wall with trim. Not only does that make your ceiling appear taller, but it makes the room look bigger. Not to mention, it makes a stronger statement overall. Ultimately, trust your eye and choose a height that pleases your aesthetic preference.
TIP: Experiment with different wainscoting heights by using painter’s tape to visualize the impact.
5. Painting the Panles
Before you decide what color and sheen to paint your trim, go back to your original vision (design) board and consider your style preference. I usually recommend painting your wainscoting the same color AND sheen as your walls, unless you’re going with a traditional style.
If you’re going with a traditional style, you’ll want your wainscoting to stand out in a prominent way. To accomplish that, paint it in a semi-gloss finish. It would give off an old-world traditional style.
If you’re going with any other style, I’d recommend going with the same color and sheen as your walls. This allows you to add that character to your space without it screaming traditional. It would also allow you to transition between trends and styles much easier. We all know how fast these change! So unless you’re a hard core, always have been, always will be traditional style lover, paint those panels the same color and sheen!
6. Chair Rail
Chair rail is a panel that is horizontal molding installed on walls, typically at the height of a chair back. Historically, chair rail protected the walls from scuffs and damage caused by furniture, while also adding character to the space. While not many people install it for its practical usage, as we have our furniture pushed away from walls in modern days, they install it for its ability to refine a room and add elegance.
I especially love it in dining rooms, and think of it as the piece that grounds and ties together all other decorative trim in a formal setting. But, if I want a room’s style to lean towards modern more than transitional or traditional, I would skip the chair rail and just go with wainscoting.
7. Baseboards & Crown Molding
PLEASE don’t install wainscoting before installing crown molding. While baseboards are commonly installed in all homes, many homes, especially builder grade, do not install crown molding. If you have the budget for only one or the other, always do your crown molding before your wainscoting. Imagine wainscoting is a painting and the baseboard + crown molding is the frame. You wouldn’t hang a painting without a frame , right? Baseboards and crown molding frame the wainscoting and work to ground the panels. Without them, the room will look unfinished.
Thickness of baseboard and crown molding is entirely up to your preference and, again, the style you’re going for. If you’d like a modern/minimal look, go with trim that is shorter than if you’re going for a vintage/transitional/traditional look. If you’re mixing styles (i.e vintage/modern) your crown molding can have vintage characters (think Dentil crown molding) and your baseboards can be higher than usual (think 8” high).
My final vision was a mix of modern and vintage, so as you can see from the picture below, I opted to go with tall baseboards (almost 9″) that gave off a vintage vibe.

8. Preparing the Wall
Most dry walls don’t need much prep work before installing wainscoting. But there are two things you should watch out for: wallpaper and uneven surface.
- If there is existing wallpaper or other wall coverings, remove them before proceeding with the wainscoting installation.
- Inspect the wall for any imperfections, such as cracks, holes, and especially uneven surfaces. We had plaster walls in our 1980 rowhouse and spent days evening them out before we installed panel molding. If you try to install panel molding on uneven walls, the panels will pull away from the wall and look warped and uneven.
This will ensure a clean and even surface for the panels.
9. Where to buy panel molding
If you want to save on the cost of wainscoting panels, do yourself a favor and skip the big commerce shops like Home Depot, Lowe’s, etc. and look for a local lumber mill near you instead. You will save hundreds of dollars when you buy panels from a lumber mill.
Also, get the panels yourself (most lumber mills deliver) as opposed to asking your handyman to get them for you. The handyman will most likely up-charge you to cover their time and effort.
We saved $500 by going the local lumber mill route as opposed to big commerce shops
Our savings pertained to when we did the pictured living room, tiny dining room, and small hallway in our 1980 row-house, so you can imagine how big the savings would be if you have a lot more area to cover.
10. To DIY or not to DIY
Installing panel molding yourself is one of the easiest ‘remodel’ projects you can take on. A quick YouTube video can break it down clearly and you can get the job done significantly cheaper than if you hire a handyman. But you gotta ask yourself: do I have the time and do I enjoy spending hours measuring, cutting, and leveling trim? I personally answered no to both questions. Never been one to enjoy a DIY 😉
If you answered ‘no’ as well, then you must be wondering if you can afford hiring the job out. And my answer is get as many quotes as you can! Here’s why. In both of our homes, I ended up getting close to 10 quotes for each job. I kid you not, the quotes varied from $1,500 – $10,000 ! I was blown away. I ended up going with someone who I trusted and fit within my budget. Hiring a professional ensured expertise, precision, and a faster installation process for us, so it was worth it.
So there you have it! My essential 10 tips for installing wainscoting / panel molding in your home. I hope that helps you in planning and executing your project. If you have any questions, leave them below and I’ll be happy to answer them! You can shop my home and finds at my shop here.
